We moved to Spain in 2014 – in October, just in time for almond harvest. Just two months later, it was time for our main crop: olive harvest time was here… you can read more about our first olive harvest here.
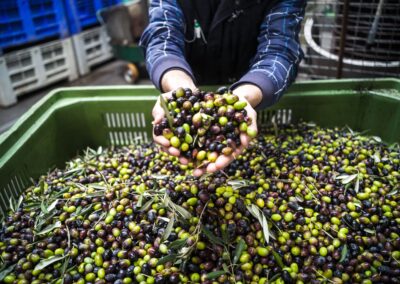
Overall, our first olive harvest was an amazing experience, and we learned an awful lot from it! We had help from a few good friends to get the work done, and were so proud of our finished product – about 100 litres (26 gallons or so) of completely organic, cold-pressed virgin olive oil. The quality of the oil was fantastic, our olives are of the Empeltre variety and you could really taste their flavour coming through.
We poured the olives into a big recipient – from that they went onto a conveyor belt. In this process, the olives are separated from remaining leaves, branches and other stuff that doesn’t belong.
So, that was 2014… now, fast forward to 2015.
Over the course of the year, we used our olive oil for EVERYTHING. Gave it away as gifts, sold it to people, used it for salads, cooking, skin and hair care, you name it. We figured we were going to get a hundred litres of oil a year, which was awesome!
We were newbies, straight from the city. We had totally overlooked one important detail – olive trees are biennial. This means that they will have an excellent crop one year – and little to nothing the next. This can be evened out with careful pruning, but we didn’t make much time for pruning that first year.
Our olive harvest in 2015 was…
Wait for it…
One plastic bag. Not even a big bag, just a normal plastic supermarket bag. We made some eating olives with it (see below), and started buying olive oil at the cooperativa.
That spring, we somehow decided our trees needed a big pruning – it still baffles me as to why (we knew that in that case, we wouldn’t get a big harvest), and I was a little sad when afterwards our big majestic olive trees appeared very meagre and thin… However, by the beginning of summer, they were full of blossoms. So maybe they didn’t have that many branches left – at least we’d get some harvest!
Alas, summer came and so did a bad spell of drought. The blossoms died right off the trees – and no olives came instead. From our 50-ish trees, only two produced olives… so we decided to keep them for eating. We were also gifted some green olives from a neighbour, and allowed to harvest one tree at a friends’ place (that tree stands in the middle of a lawn, so had been given water all summer and had an amazing harvest), so we ended up with four big buckets of olives.
We were lucky enough that winter to have three lovely volunteers over from California – and as the weather was too bad to work outside during their stay, they spent most of their working hours in our living room, preparing olives for eating.
Did you know olives are absolutely and positively disgusting when you first take them off the tree? Really, the person who discovered they are actually edible after going through a whole process, deserves a medal. Well-prepared olives taste nothing like the originals!
There are several ways to prepare olives for eating. The laziest one is as they do in local villages – they fill up a barrel with salt water, drop the olives in, and wait for six months or so. Some people will take out a small batch to eat earlier; they’ll bruise them or make a cut in them (so they absorb the water and spices better), put them in brine, and change their water every other day until they’re ready to eat.
Our technique is somewhere in the middle.
First, we soak them in water for a bit to “clean” them. This is also the best way to keep them if we’re not ready to process them immediately; when kept without water, they will mould – but they’ll keep well for at least weeks in water. So we leave them in their big buckets, but add some water to them.
When we’re ready to process the olives, we make a little cut in them. That’s where our American volunteers came in; they processed bucket after bucket and put the olives in jar after jar for days on end (all the while watching movies, series or just chatting).
We fill glass jars with the olives, and add salt water to them, filling them up really well, so there’s not much air left in the jar. Those jars go into the cellar, where the olives can absorb the salt water (and lose their bitter taste) in peace.
A few months later, we get the olives from the cellar, empty the salt water jars (the water has turned black by then), rinse the olives, and taste a few of them. On rare occasions, they’re good to eat – most of the time though, they either lack salt, or are way too salty… we haven’t been able to get our brine completely perfect yet.
So we’ll put our little olives back into their jars, adding salt water (a little less or more salty depending on their needs). In most of the jars, we’ll also add spices, preferably from the garden: thyme, rosemary, garlic, maybe a hot pepper, oregano, or whatever we think might be an interesting experiment at the time.
A few weeks later, we often have the most amazing olives to eat and serve to our guests. Every year, we’re amazed that we can make such bitter tasting little black balls into such a delicacy!
Are there any olive trees where you live? Did you ever make your own eating olives from scratch? Please leave me a comment to tell me all about it!


0 Comments